|
|
|
Vector And Raster Graphics In Hindi
वेक्टर ग्राफ़िक्स क्या है। Vector Graphics In Hindi
वेक्टर इमेज गणतीय सूत्रों(mathmetical) पर Based होती है, यानि वेक्टर इमेज को गणतीय सूत्रों या लाइन आर्ट
के अनुसार तैयार किया जाता है। ऐसी इमेज में Pixels नहीं होते हैं, बल्कि इनमे Paths शामिल होते हैं, जिन्हे Points, Lines, Curves या Shapes इत्यादि द्वारा Define किया जाता है।
Vector Image की सबसे बड़ी खूबसूरती यह है, की इसे अपनी आवश्यकता अनुसार छोटे या बड़े रूप
में Resize किया जा सकता है, जहाँ पर अधिक से अधिक Zoom In या Zoom Out दोनों ही करने पर भी इमेज की Quality
और उसका Size
सामान्य बना रहता है, यानि इमेज बिलकुल भी Blur
नहीं होती है। दूसरे सभी फाइल
फोर्मट्स की तुलना में वेक्टर सोर्स फाइल का साइज भी बहुत कम होता है।
Vector Graphics के फाइल फॉर्मेट SPG, EPS, PDF, AI इत्यादि होते हैं, और इन्हे बड़ी कंपनियों द्वारा अपनी मार्केटिंग
या Advertisement के लिए तैयार किया जाता है। वेक्टर
Images को इन मुख्य सॉफ्टवेयर द्वारा तैयार किया जाता
है, जैसे Coral Draw, Adobe Illustrator,
Inkscape, Affinity Designer इत्यादि।
यदि
एक वाक्य में कहा जाए तो कोई भी इमेज जिसे Maximum Zoom करने के बाद भी उसकी Quality सामान्य बनी रहती है, वह Vector Image होती है।
रास्टर ग्राफ़िक्स क्या है। Raster Graphics In Hindi
रास्टर इमेज वह Images होती हैं, जिन्हे आमतौर पर आप अपने कंप्यूटर या वेब पर
देखते हैं, या आपकी वो Images जिन्हे आप अपने डिजिटल कैमरे से Import करते हैं। रास्टर इमेज को Bitmap Image भी कहा जाता है।
इस प्रकार की Image ढेरों Pixels के मिलने से बनी होती है, जिन्हे Grid Formation में Arrange किया जाता है। इमेज को बड़ा करने पर Image की Quality डाउन होने लगती है, यानि इमेज Blur होने लगती है, और छोटे-छोटे ढेरों Colorful Dots आप को नजर आने लगते हैं। यह
Colorful Dots Pixels कहलाते हैं, जिनके एक साथ मिलने से कोई Picture या Image तैयार होती है। Pixel (Picture Element) किसी इमेज का एक बहुत छोटा भाग
होता है, जो अपने भीतर एक Colour Information समेटे होता है। इसी प्रकार जब ढेरों Pixels जुड़ते हैं, तो आपको एक Image नजर आती है।
रास्टर इमेज का आकार जितना बड़ा होगा, उतना अधिक उसका साइज बढ़ जाता है। इसके Resolution को DPI (Dots
Per Inch) या PPI (Points
Per Inch) के
द्वारा Define किया जाता है।
Raster Image Formats जैसे JPEG, GIF, PNG, BMP इत्यादि होते हैं, और इसके एडिटिंग सॉफ्टवेयर जैसे Photoshop, Coral Painter, GIMP इत्यादि हैं।
यदि रास्टर इमेज की पहचान करनी हो, तो कोई भी इमेज जिसे Zoom करने पर उसकी Quality Down होने लगती है, या Image Blur होने लगती है, तो वह Raster Image होती है।
, Theory on graphic
designing
ग्राफिक डिजाइन एक तरह की आर्ट है, जिसमें टेक्स्ट और ग्राफिक की मदद से मेसेज
इफेक्टिव बनाया जाता है। मेसेज ग्राफिक्स, लोगो, ब्रोशर, न्यूज
लेटर, पोस्टर या फिर किसी भी रूप में
अगर आप क्रिएटिव
हैं और नया करते रहना अच्छा लगता है, तो ग्राफिक डिजाइनिंग आपके लिए एक अच्छा करियर
ऑप्शन हो सकता है। जरूरी नहीं इसके लिए किसी इंस्टिट्यूट से कोर्स किया जाए,
कंप्यूटर और
इंटरनेट हो तो घर बैठे ही आप इस फील्ड में ब्राइट करियर बना सकते हैं.
करियर ऑप्शंस :-
हर तरफ दिखती चमक ग्राफिक डिजाइनर्स की ही
मेहनत है। पब्लिक रिलेशन, न्यूज पेपर, ऐडवर्टाइजिंग
एजेंसी, वेब पेज मैगजीन और इलेक्ट्रॉनिक मीडिया जैसी
फील्ड्स में ग्राफिक डिजाइनर्स की डिमांड रहती है। फिल्म, विज्ञापन और एनिमेशन फील्ड में इनकी डिमांड
तेजी से बढ़ी है।
पैकेज :-
इस फील्ड में 15
से 30 हजार रुपये से ही शुरुआत होती है, लेकिन बाद में एक्सपीरियंस बढ़ने के साथ आपकी
सैलरी एक-डेढ़ लाख रुपये तक भी जा सकती है।
कोर्स सिलेबस
:-
ग्राफिक डिजाइनिंग के सिलेबस में कोरल ड्रॉ, फोटोशॉप, थ्री
डी, क्वॉर्क जैसे कई सॉफ्टवेयर सिखाए जाते हैं। साथ
ही डिजिटल, ऑडियो-विडियो प्रॉडक्शन के अलावा ग्राफिक से
जुड़ी कई टेक्निकल चीजों भी बताई जाती हैं।
Photoshop
अगर आपके system में फोटोशॉप installed नहीं है तो आप इसकी official
site पर जाकर
इसे download कर सकते हैं जो की 30 दिनों के लिए free trial होगा|
इस tutorial में हमने Photoshop
CS4 version का use किया है, यदि आपके पास कोई दूसरा version है तो परेशान होने की जरूरत नही
हैं क्योंकि लगभग सभी versions में ये सारे tools common होते हैं|
Photoshop Interface
सबसे पहले हम इसके इंटरफ़ेस में उपलब्ध अलग-अलग टूल्स और options के बारे में जानेंगे| फोटोशॉप के interface
का screenshot
आप नीचे
देख सकते हैं|

Photoshop
में
Total Bar
1. Title Bar
सबसे
पहले हमारे पास Photoshop में Title Bar आती है जिस पर Title
लिखा
होता है कि आपने कौन सी File Open कर रखी है क्योंकि अगर आप Beginner
हो
तो आपको शायद पता नहीं होता कि आपने कौन सा Software Open कर रखा है जैसे Photoshop,
Coreldraw, Pagemaker या फिर Excel Etc. तो इसीलिए हमें Title बार में हमारे Software
का
title बताया जाता है.
Menu
Bar
उसके
बाद हमारे पास Menu Bar आती है जिसमें हमारे पास अलग – अलग Menu
आते
हैं जिसके अंदर हमारे पास बहुत सारे Option होते हैं जिंका use हम Photo
को
Editing करने के लिए करते हैं. Photoshop में हमारे पास 9
Menu होते
हैं जिनके नाम इस प्रकार है.
Menu bar Details
·
File Menu
- File >
New: नया file बनाने के लिये इसका shortcut
Ctrl+N है
- File
> Open: पहले
से उपलब्ध files
को open करने के लिए (Ctrl+O)
- File
> Save: File को save
करने
के लिए (Ctrl+S)
- File
> Save as: फाइल को किसी दुसरे नाम से और
अलग format
में save करने के लिए उपयोग होता है (Ctrl+Shift+S)
- File
> Save for Web & Devices: image को.png, .jpeg, या .gif format में सेव करने के लिए use किया जाता है (Ctrl|+Alt+Shift+S)
- Image
> Image Size: image की साइज़ को बदलने के लिए use होता है (Ctrl+Alt+I)
- Window:
इस option से हम फोटोशॉप में available
palettes और tool box को hide या show कर सकते हैं
·
Edit
Menu
·
Image
Menu
·
Layer
Menu
·
Select
Menu
·
Filter
Menu
·
View
Menu
·
Window
Menu
·
Help
Menu
जिसके
बारे में हम आपको आगे वाले Tutorial में बताएँगे कि इसके
अंदर हमारे पास कितने Option होते हैं और उनका use क्या है.
Application Bar
Application bar से हम Photoshop
को
maximize, minimize, close कर सकते हैं इसके अलावा Bridge
को
access कर सकते है, Photoshop के layout और workspace
को
customize कर सकते हैं|Windows में application
bar menu bar के
right side में होता है|ps- application barआप ऊपर application
bar का
screenshot देख सकते हैं, अब हम उसमे उपलब्ध options
के
बारे में जानेंगे:

Launch Bridge:
Bridge Adobe का
ही एक application है, जो की एक प्रकार का file
manager है
जिसमे आप अपने system में उपलब्ध किसी भी files की पूरी details
देख
सकते हैं, इसे
आप सीधे Photoshop के application bar से भी open
कर
सकते हैं|
View Extras: अपने document में grids,
guides या
rulers का उपयोग करना चाहते हैं तो आप view extras में जाकर इस enable
कर
सकते हैं| design बनाते समय इनका उपयोग किया जाता है जिससे डिजाईन objects
की
size measurement में आसानी होती है|
Zoom Level:
Document को
zoom करने के लिए हम zoom level का percentage
सेट
कर सकते हैं |
Hand Tool: Click
करके
Photoshop canvas को drag करने के लिए इसका
उपयोग होता है, यदि
canvas पहले से ही screen पर fit हो तो यह tool
काम
नही करेगा, document को zoom
करने
के बाद hand tool का उपयोग कर सकते हैं|
Zoom Tool:
Open किये
गये image के किसी भी हिस्से को zoom करने के लिए इसका use कर सकते हैं|
Rotate View Tool:
Document को
किसी भी angle पर rotate कर सकते हैं, इसके लिए rotate
view tool का
use कर सकते हैं|
Arrange Documents: अगर हम multiple
documents open करते
हैं तो हमारे पास options होते हैं की उन डाक्यूमेंट्स को अपने screen
पर
कैसे दिखाएँ, चाहें
तो हम एक window पर सिर्फ एक या जितने चाहें अपने अनुसार multiple
documents को
side-by-side open कर सकते हैं और
उन पर काम कर सकते हैं|
Screen Mode: तीन प्रकार के screen
modes दिए
गये हैं जिसमे से standard screen mode by default mode होता है इसके अलावा “Full
screen Mode With Menu Bar” या “Full
Screen Mode” का
option भी होता है| हम
इसे shortcut (F) button से भी access कर सकते हैं|
Workspace options:
Photoshop में
कई प्रकार के tools और palettes/panels होते हैं लेकिन जरूरी नही की हम सभी का उपयोग करें ऐसे
में हम खुद का एक workspace set करते हैं जिसमें हम हमेशा use होने वाले palettes
को
सामने रखते हैं और बाकी को hide कर देते हैं ताकि हम अपना काम आसानी से और जल्दी से कर सकें| Photoshop पहले से कुछ workspace
के
presets होते हैं जिसमे से हम अपने जरूरत के अनुसार workspace
choose कर
सकते हैं या हम चाहें तो खुद का नया workspace बनाकर save
कर
सकते हैं|
3. Tool Bar
इसके
अंदर हमारे पास कुछ Option देता है जो हमारे लिए हुए Work पर काम करता है जैसे
आप अगर कोई भी Option use करते हो जैसे Simple Rectangle तो उससे related
कुछ
design हमें Option Bar में दे देता है जिसका use हम direct
ऊपर
से कर सकते हैं. Paintbrush के Tools, Rectangle Marquee tool, Gradient
tool, Pen tool , Rectangle tool type tool के Option
में
इसका ज्यादा use होता है.

4. Status Bar
उसके
बाद हमारे पास Status Bar आती है जो Page का Status
Show करती
है.
5. Task Bar
सबसे
लास्ट हमारे पास Task Bar होती है जो हमेंशा PC या Laptop
की
Screen पर होती है. अगर आप कोई भी File को Minimize
करते
हो तो वो file आपकी task Bar पर चली जाती है.
Photoshop Screen Modes
Photoshop Modes :- फोटोशॉप में स्क्रीन मोड कई प्रकार के होते हैं
इन्हें शॉर्टकट की help से भी ओपन किया जा सकता है
View > Screen Mode
फोटोशॉप में स्क्रीन मोड का
शॉर्टकट की F. स्क्रीन मोड को उपयोग करने के लिए आपके फोटो शॉप
में कोई पिक्चर (image) ओपन होना चाहिए तभी आप स्क्रीन मोड का यूज़ कर
पाएंगे
1. Standard Screen Mode
2.Full Screen Mode
3. Full screen mode with
menu bar
फोटोशॉप में हम दो तरीके से
स्क्रीन मोड पर जा सकते हैं
1. पहला आप मीनू वार Menu bar मैं जिओ
ऑप्शन पर जाएंगे और जब आप वहां पर क्लिक करेंगे तो इस स्क्रीन मोड नाम का ऑप्शन
होगा उस पर क्लिक करने से आपके तीनों मोड शुरू हो जाएंगे जिस मोड को आप यूज़ करना
चाहते हैं उस पर आप क्लिक कर सकते हैं

2. दूसरा तरीका टूल बार की हेल्प से आप स्क्रीन मोड
पर जा सकते हैं जिसके आइकन आपको टूलबॉक्स में मिल जाते हैं इससे आप तुरंत ही
अलग-अलग मोड का यूज कर सकते हैं.

Create New Document :-
फोटोशोप पर new
document or फाइल create करने के लिए सबसे पहले आपको Photoshop open करना होगा उसके बाद menu option से File पर क्लिक करके New पर क्लिक करना है. अगर आप keyboard से new file बनाना चाहते है
तो CTRL+N press करे.

1. Name: ऊपर जो Window है उसमे सबसे
फले जो option है वो है "Name" इस option पर आप जो new Document बना रहे हो उसका नाम क्या देना चाहते हो वो
नाम आप लिख सकते हो कोई भी नाम आप type कर सकते हो.
2. Width & Height: 2nd tab पर आपको जो option मिलेगा वो है Width और Height, आप जो नया Document बनवा रहे हो उसका Width और Height कितना होगा वो
आप इस option से select कर सकते हो, अभी आपके सवाल होगा इसमें क्या साइज़ देना चाहिए तो
मैं बता दू इसका कोई लिमिटेड नहीं है आपके जरुरत के हिसाब से आपको साइज़ select करना होगा
Width और Height के side में आपको और एक option मिलेगा जिधर आपको Default cm या फिर pixel या फिर inch देखने को मिलेगा.
अभी सवाल है आपको उस option पर कोनसा select करना होगा pixel, cm
या inch! देखिये अगर आप नया इस्तमाल कर रहे हो तो आपको
Pixel को select करना चाहिए
क्युकी अभी computer, mobile पर pixel ही जादा इस्तेमाल होता है.

3. Resolution: Image quality कैसा होगा वो Resolution के ऊपर निर्भर करता है, Computer, Web, Mobile screen के लिए resolution 72 pixel/inch इस्तेमाल होता
है. Print करने के लिए resolution
300 pixel/inch इस्तेमाल होता है photo या banner के लिए ये जादा
इस्तेमाल होता है.
Color Mode : Photoshop पर बहुत सरे color मोड इस्तेमाल होता है, आप ऊपर के photo की तरह color मोड option पर क्लिक करने
पर आपको बहुत सरे color mode देखने को मिलेगा. आपको total 5 type के color मोड मिलेगा - Bitmap, Grayscale, RGB Color, CMYK Color, Lab Color.

फोटोशोप के under जितने भी color mode है हम सब को इस्तेमाल नहीं करेंगे, अगर आपको black and
white photo बनवाना है तो अप Grayscale color mode इस्तेमाल कर
सकते हो. सबसे जादा इस्तेमाल होता है RGB और CMYK Color mode.
RGB का full नाम है Red Green Blue, RGB जादा web के लिए इस्तेमाल
होता है. Printing के लिए जादा इस्तेमाल होता है CMYK Color mode.
4. Background Content : आखिर में जो option मिलेगा वो है Content इसी option से आपको select करना होगा आपको
जो new फाइल create कर रहे हो उसका color क्या होगा, अगर आपको white color चाहिए तो आप white
select करे अगर आपको कोई और color चाहिए तो आप background color को select करे.

अगर आपको लोगो बनवाना है तो आप Transparent option को भी select कर सकते हो, ये बिलकुल आपके ऊपर है की आपको कैसा background चैये आपके project के लिए.
मैं उम्मीद करता हु आपको सब कुछ समाज अ गया है, अभी आपको New Document
बनवाने के लिए "OK" पर क्लिक करना
है.

Saving Document
किसी फाइल को सेव करने के लिए File मेनू
में Save आदेश दीजिये अथवा कण्ट्रोल के साथ S (Ctrl+S) बटन दबाएँ यदि
फाइल का पहले ही कोई नाम रखा जा चूका है तो इस आदेश से बिना कोई डायलॉग खुले आपकी
फाइल सेव हो जाएगी यदि फाइल का कोई नाम अभी नहीं रखा गया है तो यह आदेश देते ही
आपकी स्क्रीन पर निचे दिए गए चित्र की तारा Save As का डायलॉग बॉक्स
खुल जायेगा!

इस डायलॉग बॉक्स के Save in ड्राप-डाउन
लिस्ट बॉक्स में उस ड्राइव और फोल्डर का नाम चुनिए जिसमे आप उस फाइल को Save
करना
चाहते है और File name text बॉक्स में फाइल का कोई नाम भरिये.
किसी चित्र को फोटोशॉप के अपने डिफ़ॉल्ट फॉर्मेट
.psd में Save किया जा सकता है यदि आप इसके बजाय किसी अन्य
फॉर्मेट में Save करना चाहते है तो फॉर्मेट ड्राप डाउन लिस्ट
बॉक्स लिस्ट को खोलकर उसमे से उचित फाइल फॉर्मेट का चुनाव कीजिये इस सुविधा के
द्वरा आप अपने कार्य को अनेको फॉर्मेटों में से किसी भी फॉर्मेट में Save कर
सकते है.
Save बटन को क्लिक करते ही वह फाइल बताये गए नाम से
बताये गए फॉर्मेट में Save कर दी जाएगी, यदि आप किसी
चित्र फाइल को नये नाम से सेव करना चाहते है तो फाइल मेनू में Save As.....
आदेश
दीजिये अथवा शिफ्ट और कण्ट्रोल के साथ (Shift+Ctrl+S) बटन दबाये |
इसके
उत्तर में भी आपको ऊपर दिए गए चित्र की तरह ही “Save as” का डायलॉग बॉक्स
दिया जायेगा | इस आदेश से फाइल सेव करने पर आप नई फाइल में
कार्य जरी रख सकेंगे.
Cursor Preference:- edit Menu > Preference पर जाना होता है उसके बाद Cursor option को सिलेक्ट किया जाता है.तो ब्रश से संबंधित सारी properties खुल जाती है
Work with Cursors Options
 Click the Edit (Win) or Photoshop (Mac) menu, point to Preferences, and then click Cursors.
 Select the Painting Cursors options you want to use:
- Standard. Painting cursors look like their toolbox icons.
- Precise. Painting cursors appear as crosshairs.
- Normal Brush Tip. Painting cursors appear with the shape of the active brush tip.
- Full Size Brush Tip. Shows the full size of the brush tip, including feathered edges.
- Show Crosshair In Brush Tip. Displays a crosshair in the center of the brush tip.
- Show Only Crosshair While Painting. Displays a crosshair while using a paint brush.
 Select the Other Cursors options you want to use:
- Standard. Painting cursors look like their toolbox icons.
- Precise. Painting cursors appear as crosshairs.
- Brush Preview. Choose a color for brush editing preview.
 Click OK.
Work with File Handling Options
 Click the Edit (Win) or Photoshop (Mac) menu, point to Preferences, and then click File Handling.
 Select the File Saving Options you want to use:
- Image Previews. Select from: Always Save, Never Save, or Ask When Saving.
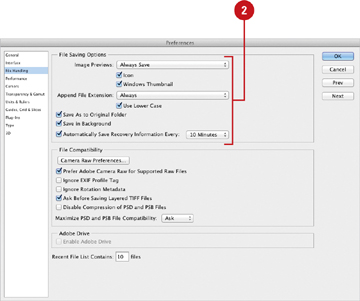
- Icon. Saves previews of the images (Mac).
- Windows Thumbnail. Saves previews viewable when using the Win File Open command (Mac).
- Append File Extension. Lets you choose whether or not to append the file extension (Mac).
- Use Lower Case (Mac) or File Extension (Win). Choose to have upper or lower case extensions.
- Save As To Original Folder. Saves the file to original folder as the default.
- Save in Background. Photoshop automatically saves while you work (New!).
- Automatically Save Recovery Information Every. Saves current document information for recovery based on a specified interval (New!).
- Image Previews. Select from: Always Save, Never Save, or Ask When Saving.
 Select the File Compatibility options you want to use:
- Camera Raw Preferences Click to choose from options such as default image settings, cache size, DNG file handling, and whether or not to open JPEG and TIFF files with Camera Raw.
- Prefer Adobe Camera Raw for Supported Raw Files. Open supported raw files in Camera Raw.
- Ignore EXIF Profile Tag. Ignores color space metadata attached to digital camera images.
- Ignore Rotation Metadata. Ignore metadata attached to digital camera images (New!).
- Ask Before Saving Layered TIFF Files. Lets you create multi-layered documents, and then save them using the TIFF format.
This is a distinct advantage when you need to use multi-layered files and you don’t want to save them using Photoshop’s proprietary format (PSD).
- Disable Compression of PSD and PSB Files. Disables compression of files (New!).
- Maximize PSD and PSB File Compatibility. Lets you save PSD files that can be opened in earlier versions of the program and PSB (Large Document Format) files.
 Select the Enable Adobe Drive check box to enable Adobe Drive in your work process.
 Enter the number of files (up to 30) to keep in the Recent File List box.
 Click OK.
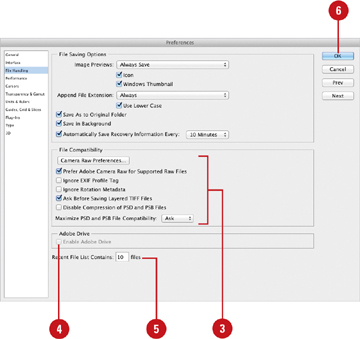
Image Resolution :-
- DPI (dots per inch) is for Print. (the dots are dots of ink on paper or other surfaces).
- PPI (pixels per inch) is Pixels. (digital resolution on a screen)
There are 3 components to an image size/resolution.
- (D) Dimensions: the actual size in pixels
- (S) Size: In inches or cm
- (R) Resolution: How many pixels in that inch.
We can calculate the dimensions if we multiply the size by the resolution. for example, if you need to deliver a 10 inch image at 100 ppi you would need the dimensions to be 1000 pixels (10 x 100 = 1000)

Let’s look at this closely.
The original file we looked at is 939 pixels wide (width always comes before height)
This image is at screen resolution 82 ppi (the resolution of the monitor, 82 pixels fits into a single inch of screen size) The width of the file is 11.451 inches.
So, to calculate dimensions 11.451 x 82 = 939 (S x R = D)


3 topic
Cropping is the process of removing portions of a photo to create focus or strengthen the composition. Use the Crop tool to crop and straighten photos in Photoshop. The Crop tool is non-destructive, and you can choose to retain the cropped pixels to optimize the crop boundaries later. The Crop tool also provides intuitive methods to straighten a photo while cropping.
For all operations, visual guides provide an interactive preview. When you crop or straighten photos, real-time feedback helps you visualize the final result.
Crop a photo
From the toolbar, select the Crop Tool
 . Crop borders display on the edges of the photo.
Draw a new cropping area or drag the corner and edge handles to specify the crop boundaries in your photo.
(Optional) Specify the Crop options using the Control bar.

Crop tool options in Photoshop A. Aspect Ratio menu B. Swap Width and Height values C. Overlay Options
Size and proportions
Choose a ratio or size for the crop box. You can also choose a preset, enter your own, or even define your own preset values for later use.
Overlay Options
Choose a view to display overlay guides while cropping. Guides such as Rule of Thirds, Grid, and Golden Ratio are available. To cycle through all the options, press O.
Crop Options
Click the Settings (gear) menu to specify additional crop options.
Use Classic mode
Enable this option if you want to use the Crop tool like it was in previous versions of Photoshop (CS5 and earlier).
Auto Center Preview
Enable this option to place the preview in the center of the canvas.
Show Cropped Area
Enable this option to display the area that is cropped. If this option is disabled, only the final area is previewed.
Enable Crop Shield
Use the crop shield to overlay the cropped areas with a tint. You can specify a color and opacity. If you Enable Auto Adjust Opacity, the opacity is reduced when you edit the crop boundaries.
Delete cropped pixels
Disable this option to apply a non-destructive crop and retain pixels outside the crop boundaries. Non-destructive cropping does not remove any pixels. You can later click the image to see areas outside current crop borders.
Enable this option to delete any pixels that are outside the crop area. These pixels are lost and are not available for future adjustments.
Adjusting Canvas :-
जब आप किसी Image का Canvas Size बदलते हैं, तो आप Image Canvas के क्षेत्रफल की मात्रा (amount of area) को बढ़ाते या घटाते हैं।
इसका मतलब है कि Canvas के Size में जोड़ने से Image के चारों ओर खाली क्षेत्र (blank area) जुड़ जाएगा। और दूसरी तरफ, यदि Canvas के Size को कम करते है तो परिणामस्वरूप Image Crop (क्रॉप) हो जाती है।
जिसका मतलब है कि आप इसे जिस साइज़ मे क्रॉप करते हैं, उसके आधार पर आप उस इमेज को खो देंगे जो Crop के बाहर रह गए है और इमेज निर्धारित साइज़ के अनुसार क्रॉप हो जाएगी।
सबसे पहले यह देखेंगे की Canvas Size का उपयोग Photoshop मे कैसे किया जाता है? | How To Use Canvas Size In Photoshop?
जिसके लिए नीचे दिए स्टेप्स को फॉलो करें”
1. File > Open > कोई भी Image ओपन करे।
2. इमेज ओपन के होने के बाद Image > Canvas Size को सिलेक्ट करे।

Canvas Size in Photoshop | Photoshop Tips 3. अब यदि आप इमेज की width और height को बढ़ाएंगे। तो आप पाएंगे की इमेज के width और height मे blank area आ गया होगा।

Increase Canvas Size | Photoshop Tips 
After Increasing Canvas Size | Photoshop Tips 4. यदि हम इसे इमेज के width और height को घटाएंगे। तो आप पाएंगे की इमेज के क्रॉप हो जायेगे।

Image Size :-
अब बारी है Image Size के उपयोग करने के तरीके की Photoshop मे | How To Use Image Size In Photoshop?
नीचे दिए स्टेपस को फॉलो करके आप Photoshop मे Image Size का उपयोग कर सकते है।
1. File > Open > कोई भी इमेज ओपन करे।
2. इमेज ओपन के होने के बाद Image > Image Size को सिलेक्ट करे।

Image Size 3. अब यदि आप इमेज की width और height को बढ़ाएंगे। तो आप पाएंगे की इमेज के width और height क साथ Image का resolution भी बढ़ जाएगा और हो सकता है कि image थोड़ी धूधली देखे।

Image Size Increase 
After Image Size Increased 4. यदि हम इस इमेज के width और height को घटाएंगे। तो आप पाएंगे की इमेज के width और height क साथ Image का resolution भी घट जाएगा।


0 Comments